This post describes how to write Shiny Apps that can render parameterized RMarkdown reports and automagically create the user interface elements needed to set parameters from the app, while defining those in the RMarkdown file alone.
Intro
An R Shiny App can offer a graphical user interface to your analysis implemented in R. This makes it attractive for a client who e.g., doesn’t know about R.
Reporting i.e., reoccuring analysis of new data is another thing an institution or company might be interested in.
It’s also somethings that R is really good at (thanks to packages likes rmarkdown and knitr).
Parameterized reports make it easy for the report to be reused in conjunction with new data.
For example adding a date parameter to a report that filters the data to be analysed in the report.
The client can then simply change this parameter and re-run the report.
However, in this case, the client is back on it’s own to have R installed locally and to know what to do with the *.Rmd file
that contains the analysis.
Simple Shiny Report Renderer
It’s not hard to program a Shiny App that takes care of report rendering.
Here an example app.R file:
writeLines(text = "---\ntitle: Test\n---",
           con = f <- tempfile(fileext = ".Rmd"))

ui <- function() {
  downloadButton(outputId = "report", label = "report")
}

server <- function(input, output, session) {
  output$report <- downloadHandler(filename = "report.html",
                                   content = function(file) {
                                     rmarkdown::render(input = f,
                                                       output_file = file,
                                                       quiet = TRUE)
                                   })
}

shinyApp(ui, server)
This is an (extremly) minimal example with a report that doesn’t have any parameters. To make the point of this post, we will need a report that has parameters.
Parameters and Parent Frames
In order to parameterize a report, one can simply add parameters into the YAML header of
a .Rmd file under params. Here is an example
   ---
   title: Test Report
   params:
      n: 10
   ----

   ```r
   mean(rnorm(params$n))
   ```
This simple report defines a parameter n = 10.
It is then accessible from the list variable params.
You can put any valid R expression as an parameter.
At this point, if we wanted to change the parameter, we would need to edit the YAML header of the file accordingly.
In addition, one can also access any variables that are present in any frame higher up the calling stack.
In R, the levels of the calling stack are called frames.
The parent frame i.e., the environment from which something is called, is the immediate level above the current evaluation.
A more detailed explanation about frames can be found in Advanced R.
A quick look at R’s documentation of the <<- operator is also revealing.
To put it all together in these terms: Rendering a report means to evaluate R code chunks - those from the report - in a child-frame of the
running Shiny app. Hence, bindings - variables, functions, reactives - defined in the server()-function from above can be accessed within
the report’s R code chunks as well.
Taking advantage of this, we can practically replace static YAML-defined parameters by Shiny inputs that can be set from the UI.
So a report.Rmd file like this
---
title: Test
---

```{r}
paste0("n = ", input$n)
```
can be rendered and downloaded by this Shiny app, given we add the respective input
ui <- function() {
  fluidRow(
           column(width = 6,
                  numericInput(inputId = "n", label = "n", value = 10),
                  downloadButton(outputId = "report", label = "report")))
}

server <- function(input, output, session) {
  output$report <- downloadHandler(filename = "report.html",
                                   content = function(file) {
                                     rmarkdown::render(input = "report.Rmd",
                                                       output_file = file,
                                                       quiet = TRUE)
                                   })
}

shinyApp(ui, server)
into this document

Dynamically create UI
If you wanted a Shiny app to render several different reports by the above mechanism,
one would need to dynamically provide different UI elements in the Shiny app, depending on which report is to be rendered.
In shiny, one can create UI elements during runtime by placing a generic placeholder into the ui-part via uiOutput(...) and
create a corresponding shiny render function via renderUI(...). The expression that is passed into renderUI(...) can return
a single shiny input element or a list of several.
This allows to programmatically create a number of UI elements. Here is an example:
ui <- function() {
  fluidRow(
           column(width = 6,
                  selectInput(inputId = "report_selector",
                              label = "report",
                              choices = list(`Report A` = "a", `Report B` = "b")),
                  uiOutput(outputId = "report_params"),
                  downloadButton(outputId = "report", label = "report")))
}

server <- function(input, output, session) {
  output$report_params <- renderUI({
    req(input$report_selector)
    switch(input$report_selector,
           a = numericInput(inputId = "n",
                            label = "Report A Parameter",
                            value = 10),
           b = selectInput(inputId = "n",
                           label = "Report B Parameter",
                           choices = letters[1:3]),
           NULL)})

  output$report <- downloadHandler(filename = "report.html",
                                   content = function(file) {
                                     rmarkdown::render(input = "report.Rmd",
                                                       output_file = file,
                                                       quiet = TRUE)
                                   })
}

shinyApp(ui, server) 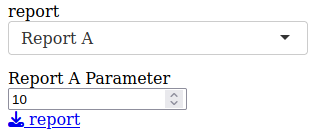
Figure 1: Numeric input UI element created at runtime.
The above code creates an UI placeholder with input ID report_params.
In addition, there is a dummy report selector, to choose between two different reports.
The corresponding shiny reactive uses the report selector’s current state to either create a
numeric input field in case “Report A” is selected or a selector input in case of “Report B”.
Again, those inputs are accessible within the report.
Ask the child what it wants
Building an app similar to the last example requires both parts - the *.Rmd-file and the app - to match.
Consider a team of analysts who have to create their individual reports as *.Rmd-files and who want
to provide those centrally to a client or their boss. The shiny app developer would have to make sure the app always
creates the necessary inputs for each and every report, always. It is a task prone to error, as is always the case
with manually syncing duplicate information.
The solution to this problem is the idea of this post: To include a UI recipe into the report. This UI recipe is used by the shiny app to create all necessary UI elements dynamically. The place where we can do this is the YAML header of the report. Here is an example:
---
title: Test
recipe:
  report_param:
    input: numericInput
    inputId: n
    label: sample size
    value: 30
    min: 0
    max: NA
    step: 5
---
Since YAML allows nested data, we can insert UI recipes into the report i.e.,
a list of named UI elements an report expects to exists as shiny inputs in it’s parent frame.
The recipe section of the YAML header can be parsed into a list in R using rmarkdown::yaml_front_matter().
Unfortunately, the documentation of this function is not really revealing, but here is what happens
r"(
---
title: Test
recipe:
  report_param:
    input: numericInput
    inputId: n
    label: sample size
    value: 30
    min: 0
    max: NA
    step: 5
---
)" |> writeLines(f <- tempfile())
rmarkdown::yaml_front_matter(f)
## $title
## [1] "Test"
##
## $recipe
## $recipe$report_param
## $recipe$report_param$input
## [1] "numericInput"
##
## $recipe$report_param$inputId
## [1] FALSE
##
## $recipe$report_param$label
## [1] "sample size"
##
## $recipe$report_param$value
## [1] 30
##
## $recipe$report_param$min
## [1] 0
##
## $recipe$report_param$max
## [1] "NA"
##
## $recipe$report_param$step
## [1] 5file.remove(f)## [1] TRUEThe above example creates a dummy YAML header, saves it into a temporary file and
calls rmarkdown::yaml_front_matter() to parse that very file. As a result, we receive
a named nested list, whoes structure matches the one from the YAML header.
We can use such a list now, to automatically build the UI elements it describes.
Consider the following shiny app with two RMarkdown files in the same directory -
the one from above (report-a.Rmd) and
---
title: Test
recipe:
  report_param:
    input: selectInput
    inputId: "n"
    label: sample size
    choices: [A, B, C]
    selected: A
---

```{r}
paste0("n = ", input$n)
```
as report-b.Rmd
ui <- function() {
  fluidRow(
           column(width = 6,
                  selectInput(inputId = "report_selector",
                              label = "report",
                              choices = list(`Report A` = "report-a.Rmd",
                                             `Report B` = "report-b.Rmd")),
                  uiOutput(outputId = "report_params"),
                  downloadButton(outputId = "report", label = "report")))
}

server <- function(input, output, session) {
  output$report_params <- renderUI({
    req(input$report_selector)
    params <- rmarkdown::yaml_front_matter(input$report_selector)[["recipe"]]
    lapply(params, FUN = function(x) do.call(x$input, args = x[names(x) != "input"]))
  })


  output$report <- downloadHandler(filename = "report.html",
                                   content = function(file) {
                                     rmarkdown::render(input = "report.Rmd",
                                                       output_file = file,
                                                       quiet = TRUE)
                                   })
}

shinyApp(ui, server)
The renderUI() reactive creates the uiOutput placeholder report_params.
input$report_selector was set with the choices parameter as a named list,
which causes the UI combobox to display the name(s), but returns the value when inspected within function server.
We can use this feature to easily select the file name or path to a RMarkdown file.
The selection is passed directly into rmarkdown::yaml_front_matter() of which the
recipe section is selected, which itself is a list. Using lapply, for each
top-level element of the list we basically run do.call(x$input, arg = x[names(x) != "input"]),
where x is always the current element of the list.
The recipe elements in this example follow all the same structure. There has to be an element named input
which matches an existing shiny UI function such as e.g., selectInput. This allows us to apply do.call(),
which takes a name of a function as a character vector and calls this function passing the parameters
specified by args as a named list. The trick here is to bulk-select all elements whoes name is not
input. The parameter names obviously have to match the ones for the function that creates the UI element.
In case of selectInput() there are only three mandatory - inputId, label and choices.
The top-level name for each recipe doesn’t really serve any purpose other than providing a descriptive name for your developer colleagues. I think they could all be the same, but I haven’t tried it.
Comments